Nowadays, deployment plays a major role in applying Deep Learning in daily life. We could build an algorithm and develop a demo in our development machine. However, to put these algorithm in production at large scale, using Deep Learning framework offered by large corporations is a requirement. Today, I will introduce AWS SageMaker from Amazon.
I. What is SageMaker
According to Amazon Web Service(AWS):
Amazon SageMaker is a fully-managed machine learning service. With Amazon SageMaker, data scientists and developers can quickly and easily build and train machine learning models, and then directly deploy them into a production-ready hosted environment.
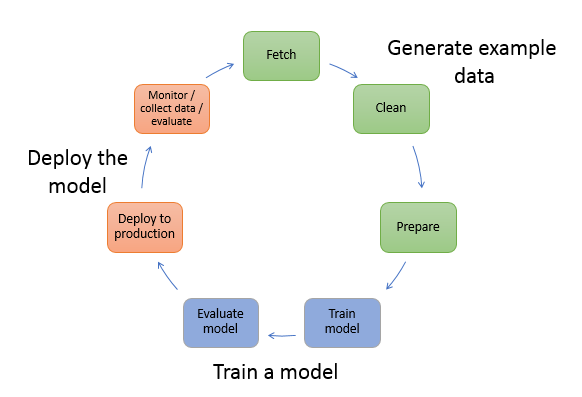
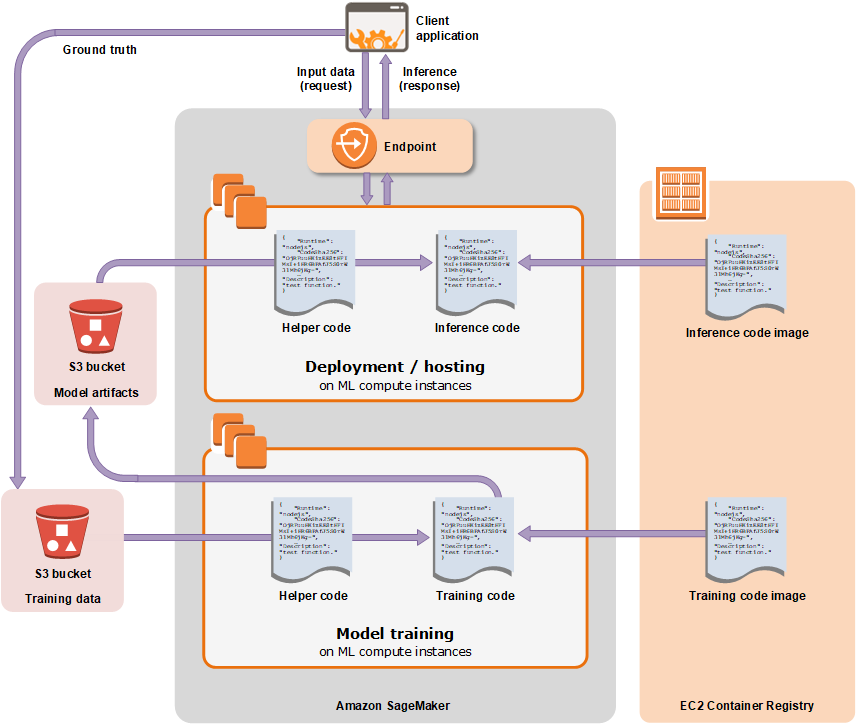
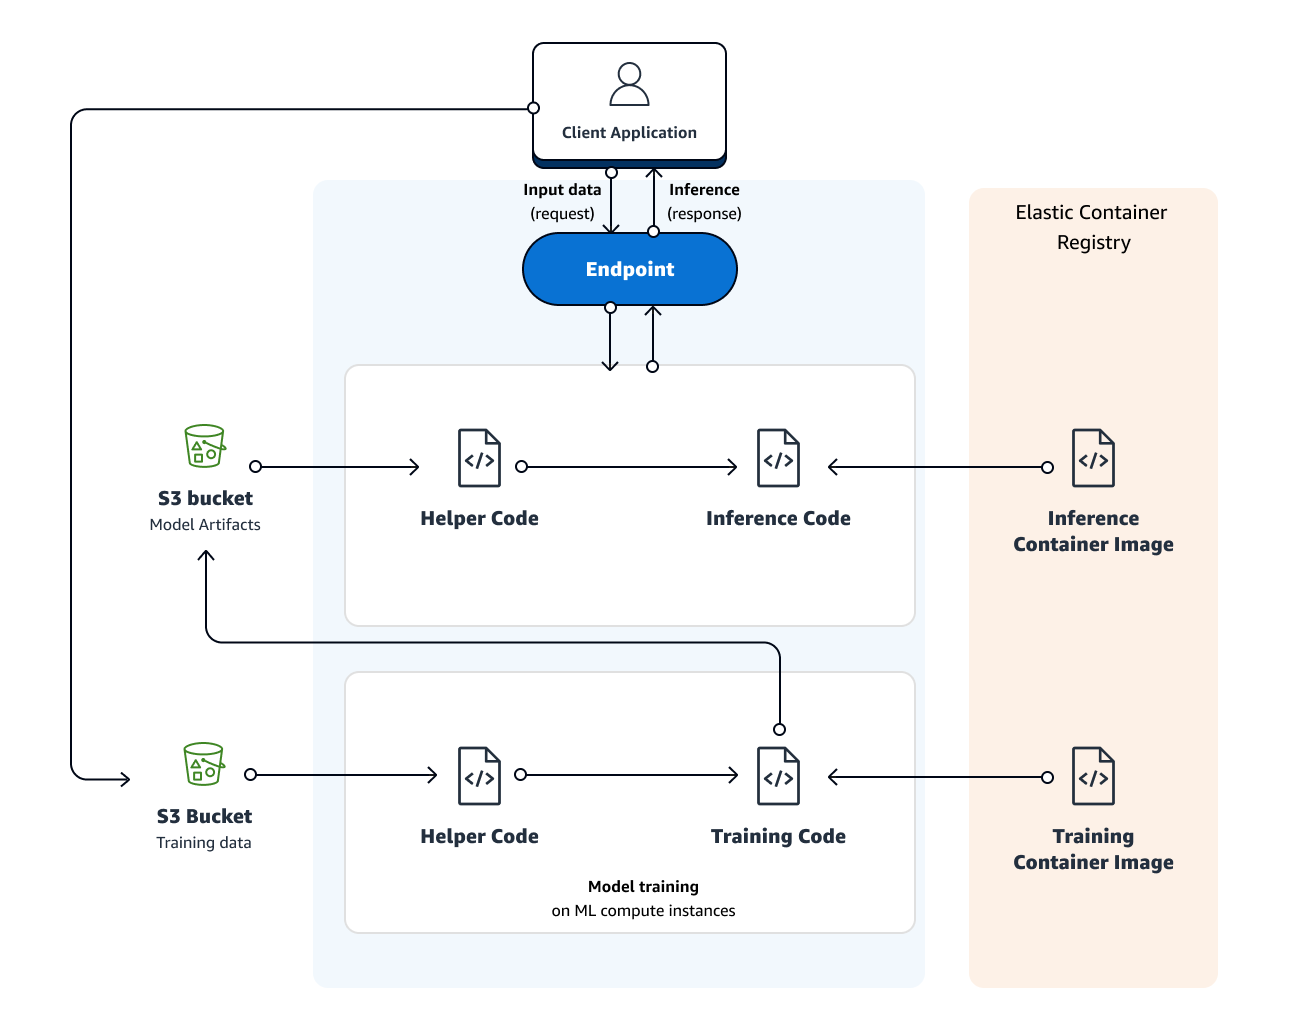
We can imagine this way: SageMaker, alongside with S3 and Elastic Container Service(ECS), form an ecosystem for Machine Learning practitioners to store their datasets, build and package algorithms, train and store the models, maybe run the inference if necessary.

In SageMaker, we can call an algorithm through a Jupyter Notebook, supply it the dataset from S3 Storage, choose the instance type then run the notebook.
It is basically what SageMaker is. Now I will delve deeper into how to use algorithms in SageMaker
II. How to implement an algorithm in SageMaker
In general, there are three ways to implement an algorithm in this framework:
-
Use built-in algorithm offered by SageMaker: AWS SageMaker provides us some algorithms in many fields as packages in their Python SDK. Nevertheless, their number is still limited and we cannot tweak it manually.
-
Write our own algorithm, then upload to SageMaker to train. In our code used for training and inference written in TensorFlow, the script must contain at least these functions:
- model_fn: Define the model.
- train_input_fn: Preprocess and load training data.
- eval_input_fn: Preprocess and load evaluation data.
- serving_input_fn: Define the data pipe to be passed during prediction.
The structure above follows the model from tf.estimator except in the input functions, we can insert the parameters in the function. More detail can be found in this link.
It is more flexible than the first option since we could interfere with the algorithm. However, we have to depend deeply on the framework. For example, our code needs TensorFlow 1.10 to run perfectly, but SageMaker supports no further than 1.9 version, so there is nothing we could do in this situation.
-
Write our own algorithm, dockerize it (and its prerequisites) into an image and store this image in ECS. In SageMaker, we pull the image from ECS repositories and run it as perfectly as we expected. How to dockerize the algorithm and run the image smoothly will be the main goal of this post.
III. Dockerizing our own algorithm properly
1. Overview of Docker
Docker provides a way for us to package our code and deploy it anywhere. In principle, it creates a box called image and install all the prerequisite packages for the code to run, not to mention the code itself, in that image. Once you have the image, you could run the container based on the image. Container is just a process which do the job based on the instruction of the code in the image. Self-contained environment in the container guarantees that the container run smoothly just as in the development machine.
Docker uses a simple file named Dockerfile to specify how an image is created. Docker can be store locally as well as in remote repositories like ECS.
In SageMaker, we need a specific outline to construct Docker image to be invoked successfully. I will focus only on the training process, the hosting is not really interesting in the production since we have to deploy in our own way.
2. How Amazon SageMaker handles your Docker container
In the below illustration, I present the file system in the container under /opt/ml :
/opt/ml
│
├── code
│
├── input
│   ├── config
│   │   ├── hyperparameter.json
│   │   └── resourceConfig.json
│   └── data
│       └── <channel_name>
│           └── <input data>
├── model
│   └── <model files>
└── output
    └── failure
/opt/ml/code: contains all the code to run the program. For example, when we execute the fit function, SageMaker will come to this directory and execute the train script.
/opt/ml/input/config: When we specify the resource configuration and the training parameters, SageMaker will copy the content to 2 above JSON file. In the code, we have to deal explicitly these json file, especially the hyperparamters.json.
/opt/ml/input/data/: When we define the data location from S3 Storage, SageMaker will download the data into the folder channel_name of this directory. The data used as argument of fit function will be placed under channel training.
/opt/ml/model: All the checkpoints and model export will be place in this directory.
/opt/ml/output: The failure file in this directory will record the error if existed in the training process. If everything goes as expected, no failure will be found.
Notices
-
All the keys and values in the hyperparameter.json will be in string format no matter what format they are originally. So we have to deal with this conversion explicitly in our code.
-
All the key strings and value strings have the limit of 256 characters. So we cannot have multi-layers json file.
-
In TensorFlow, we have two main functions with the estimator: fit for training and deploy for hosting. So the data location used for evaluation will be in training channel since the evaluation is only implicit under the fit function.
-
We could access the file system inside the container by using:
docker run –rm -ti -v $(pwd)/test_dir:/opt/ml ner_tagger:latest sh
3. What we have to prepare in order to build an image
There are three components to prepare:
-
Dockerfile: The instruction which decides how to create the environment.
There are some differences from the normal Dockerfile:
-
ADD /ner_tagger /opt/ml/code: Copy all the necessary code to the /opt/ml/code and set this directory as WORK_DIR
-
ENV PATH=/opt/ml/code:${PATH}: Set the default path. Remember this is inside the file system of container, not host machine nor development machine.
-
RUN chmod +x /opt/ml/code/train && /opt/ml/code/serve: Give permission to train and serve file.
-
-
Makefile (or a .sh file): Give the order to build Dockerfile and push the image to repositories.
-
A folder which contains all the code, in this case, ner_tagger. In this folder, we need at least 3 scripts:
-
main_scipt.py: which contains the algorithm and ready to run in our developing machine.
-
train: which will be called when we execute the fit function. This file is only a script with python interpreter, not a .py file. So we need to give them the permission to run.
-
serve: it is similar to train, but during the interfere process.
-